We are approved by
Trading Standards!
for your peace of mind!
Using PhotoDesiree Software A quick guide to using HiTi Photo Desiree Photo Printing Software.
In our opinion HiTi's Photo Desiree is a very useful piece of software. Although it may look a bit "clunky", it is actually very good at printing photos! This brief guide will give you an insight into how to use it and once you've started to use it, you won't want to use anything else!
This webpage describes the use of PhotoDesiree 2; however, earlier versions are similar in operation.
Step by Step Explanation of PhotoDesiree
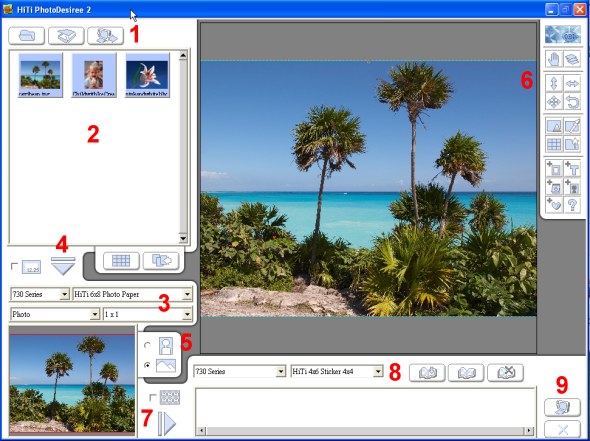
The above screen shot shows 9 different steps that will allow you to print perfect pictures. By following these simple steps you can see how easy it is to use:
These three buttons allow you to select where your images are coming from. The left hand button opens a browse for files window, the middle button allows you to obtain images from a twain device, like a scanner, camera etc and the right hand button will allow you to choose images from your HiTi printer's card slot.
When you have selected your images, they appear in this window (as shown).
Select the paper size that you wish to print on, and the layout.
1x1 means 1 photo on the whole page.
1x2 means two copies of the same image (each image is half the total page size).
2x1 means the same as 1x2, except the images can be different.
When using stickers, these options will change allowing even more flexibility.
After selecting an image (by clicking it), a press of the button in the shape of a down arrow, will copy the image into the small preview windows to the left of no.7. The image will also appear in the large preview / edit window.
You can choose if you want the image printed in Portrait (upright) or Landscape orientation by clicking the appropriate image.
When the image appears in the large edit / preview window, you can choose to fit the image by its height (the whole height of the image is printed) or by its width (the whole width of the image is shown). Due to the paper sizes and image created by the camera, images rarely fit exactly and this option allows you to choose how the photo should fit.
There are also a wide range options and features available by clicking on the buttons on the right hand side. The best way to get to grips with them is to experiment. They won't alter your original image!
The options include:
Image Rotation, Image Sharpness, Colour Adjustment, Special Image Processing, adding Text to the Image, adding Calendars, adding Frames.
Once you are happy with the image, press the Right Arrow button to add the image to the print queue. You can then choose how many images you wish to print.
The print queue is a good idea and you can select all your images at different sizes and then print all of one size at a time.
By selecting the print size here, you will display the appropriate print queue for that size of paper. You also have the option to save and load "albums" by clicking the appropriate buttons.
Simply press the print button to print the selected image or all the queue.
Once you've used PhotoDesiree a few times you'll realise just how easy it is to use!