|
| Home> Photo Printing at Home> Hi-Touch Dye Sub Photo Printers> Using the Hand Controller on Stand Alone HiTi Photo Printers | |||||||||||||||||||||||||||||||||||||||||||
|
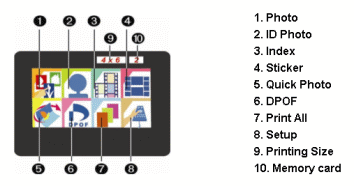
An explanation of the options on the LCD Menu. There are eight basic operations that can be selected from the LCD window; they are detailed below.
4. Sticker - You can print a selection of stickers using this option. 5. Quick Photo - The quickest way to print a photo. 6. DPOF - If your camera supports DPOF mode and you have selected the photos you wish to print on the camera, then selecting this option will print all pre-selected images. 7. Print All - Prints all the images on the memory card. 8. Setup - Allows you to change some of the default options on the printer. 9. Printing Size - Select which size of print you require. 10. Memory Card - Select between different memory cards in the printer, if more than one is installed.
|
||||||||||||||||||||||||||||||||||||||||||


