Event Photography - Dye Sublimation Photo Printers - ID & Passport Photo Printers
  Shop - Reviews - Latest News - Knowledgebase - Help & Support - Catalogue - About Us

Home> Professional Dye Sublimation> Kodak 1400 Photo Printer> Installing your Printer


Kodak 1400 - Installing your Printer (5 of 8)
A Step by step guide to installing your Kodak 1400 printer with a PC

Kodak launch their New 805 Dye Sublimation Photo Printer

Kodak's New 805 Photo Printer supersedes the Kodak 1400 Photo Printer.

Delivery Date: 3rd or 4th quarter 2007

New

Installing your KODAK 1400 Photo Printer
There are eight simple steps that need to be followed. Take each step one at a time, read the instructions carefully and you should have no problems at all. If you have any problems during installation then contact us.

Each step is described in detail:

Step 1 - Find a suitable location
Step 2 - Unpack the Printer
Step 3 - Load the Ribbon Carrier
Step 4 - Install the Printer Driver
Step 5 - Connect the USB
Step 6 - Load the Paper Tray
Step 7 - Install the Dust Cover
Step 8 - Make a Test Print


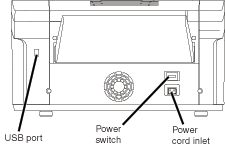
Step 5 of 8 - Connect the USB

The USB cable is not included with the 1400 Printer and must be purchased separately. (Please note that System Insight provide a free 5 metre USB 2.0 cable when you purchase a Kodak 1400 Profesional from us). The printer has a standard USB 2.0 port. While you can use any "A-B" USB cable, USB 2.0-compatible cable achieves maximum speed.

  • Connect the USB cable. IMPORTANT: You must install the printer driver before you connect the USB cable.

Kodak 1400 USB Port

  • Connect and secure the USB cable to the USB port.

  • Connect the power cord, then turn the power ON. Note: The POWER light turns green.


    The USB cable is now connected.


Step 6 - Load the Paper Tray


© Copyright System Insight 1998-2007 - E & OE -All Trademarks Respected - www.systeminsight.co.uk